Step 1: Ensure your iPhone or iPad is LiDAR-enabled
iPhone
- 12 Pro
- 12 Pro Max
- 13 Pro
- 13 Pro Max
- 14 Pro
- 14 Pro Max
iPad
- Pro 11-inch (3rd generation onwards)
- Pro 12.9-inch (4th generation onwards)
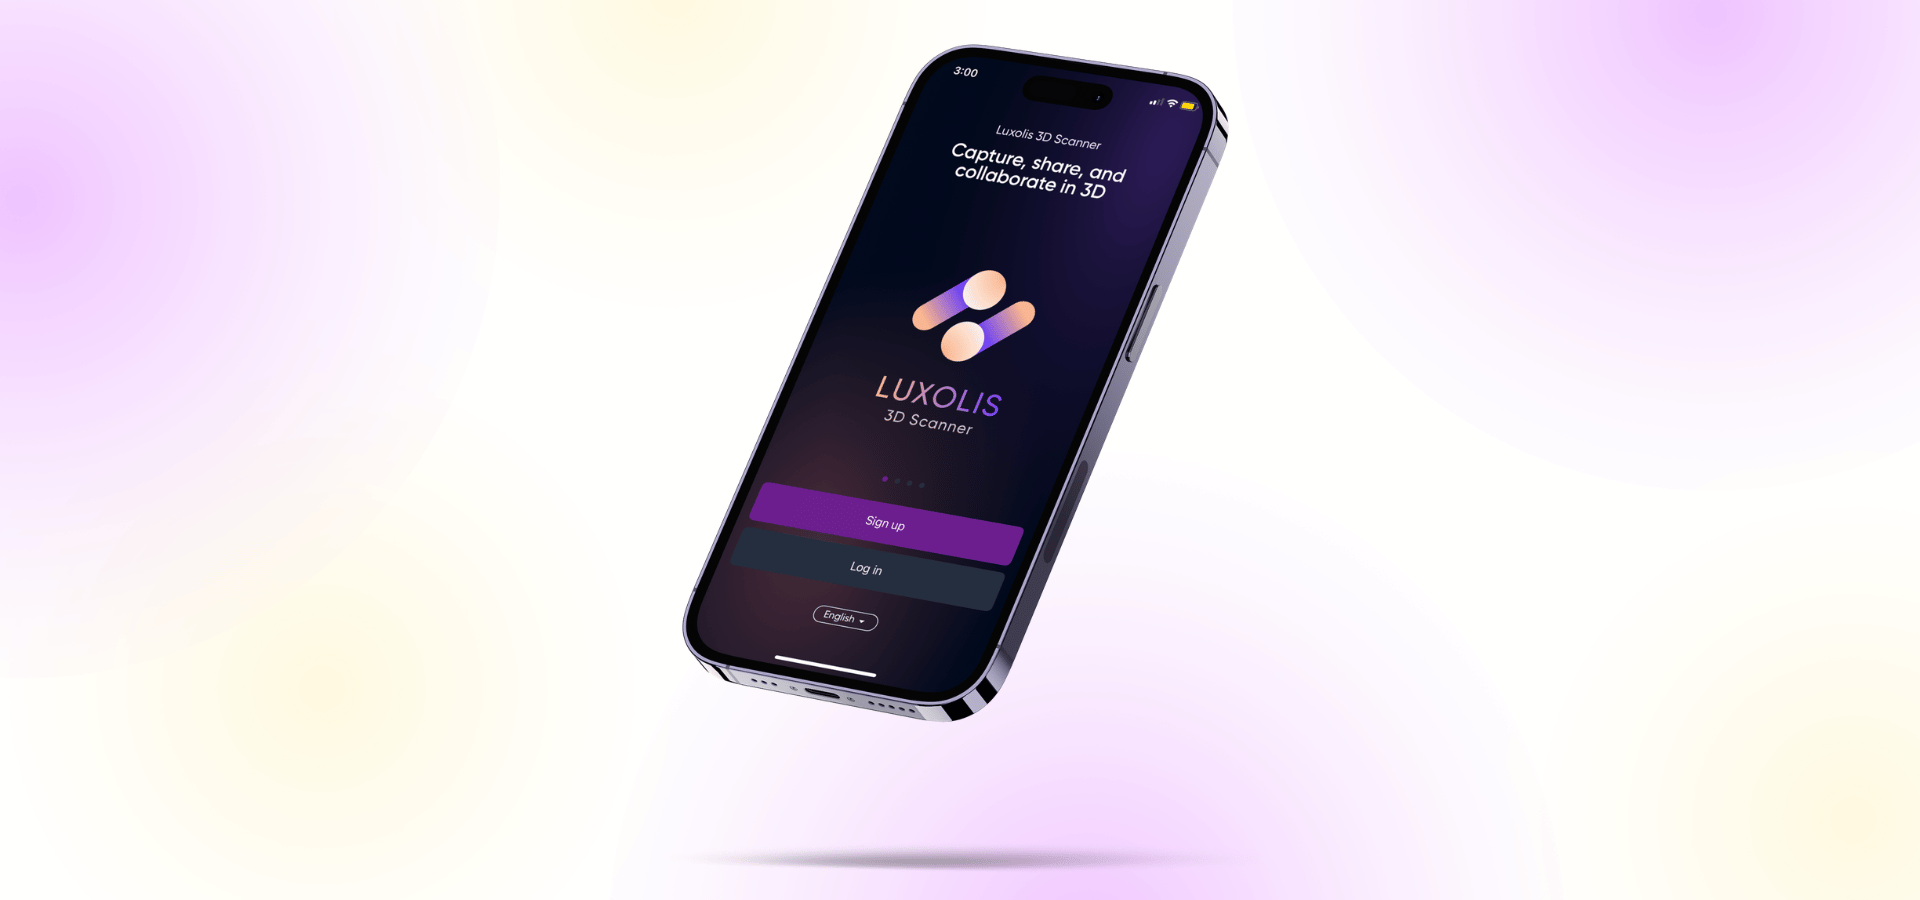
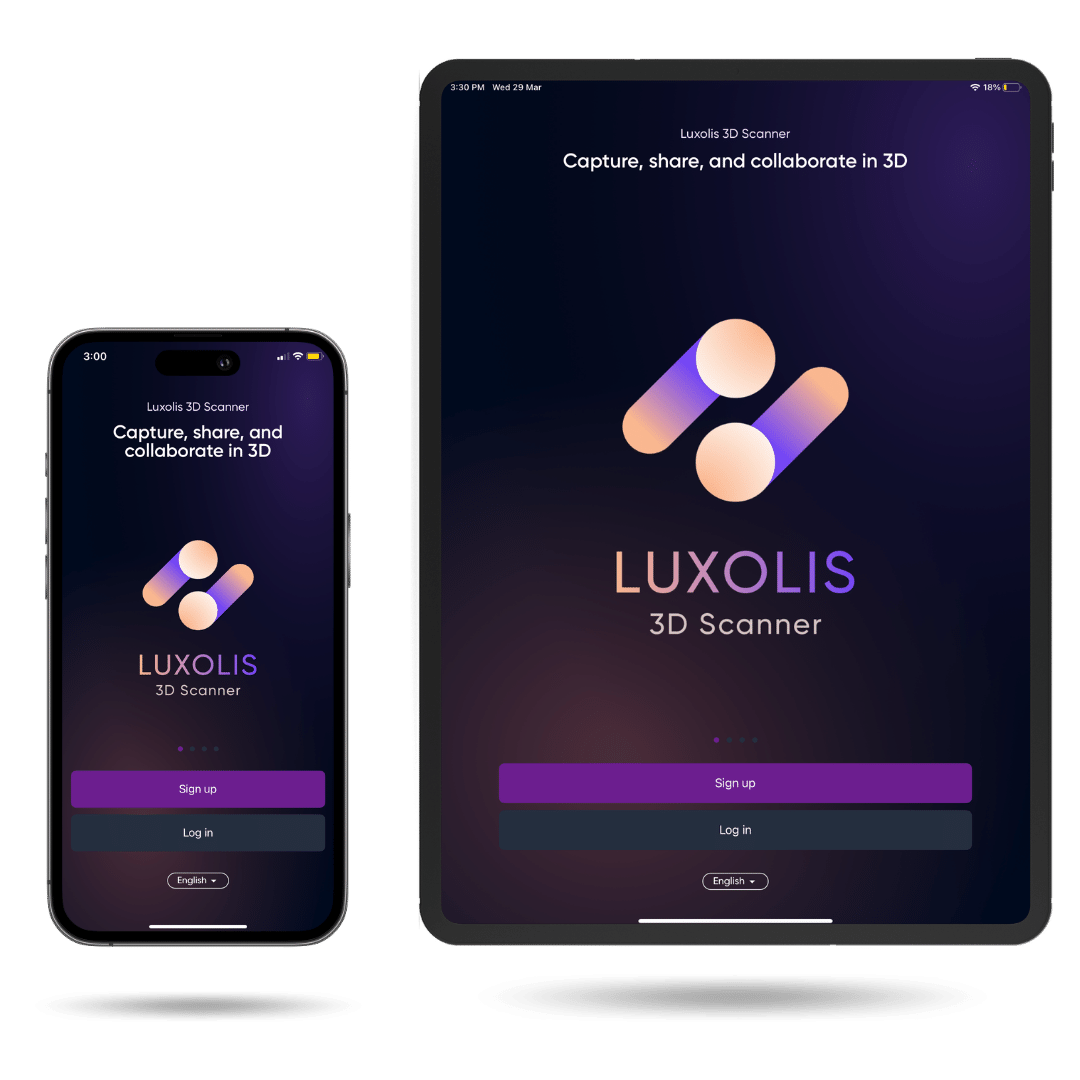
Step 2: Download and sign up
Signing up for the Luxolis 3D Scan App is a quick and simple process that takes just a few minutes. All you need is an email address and a password to get started, and you can begin exploring the app’s exciting features in no time! The app lets you log in as an individual or an organization.
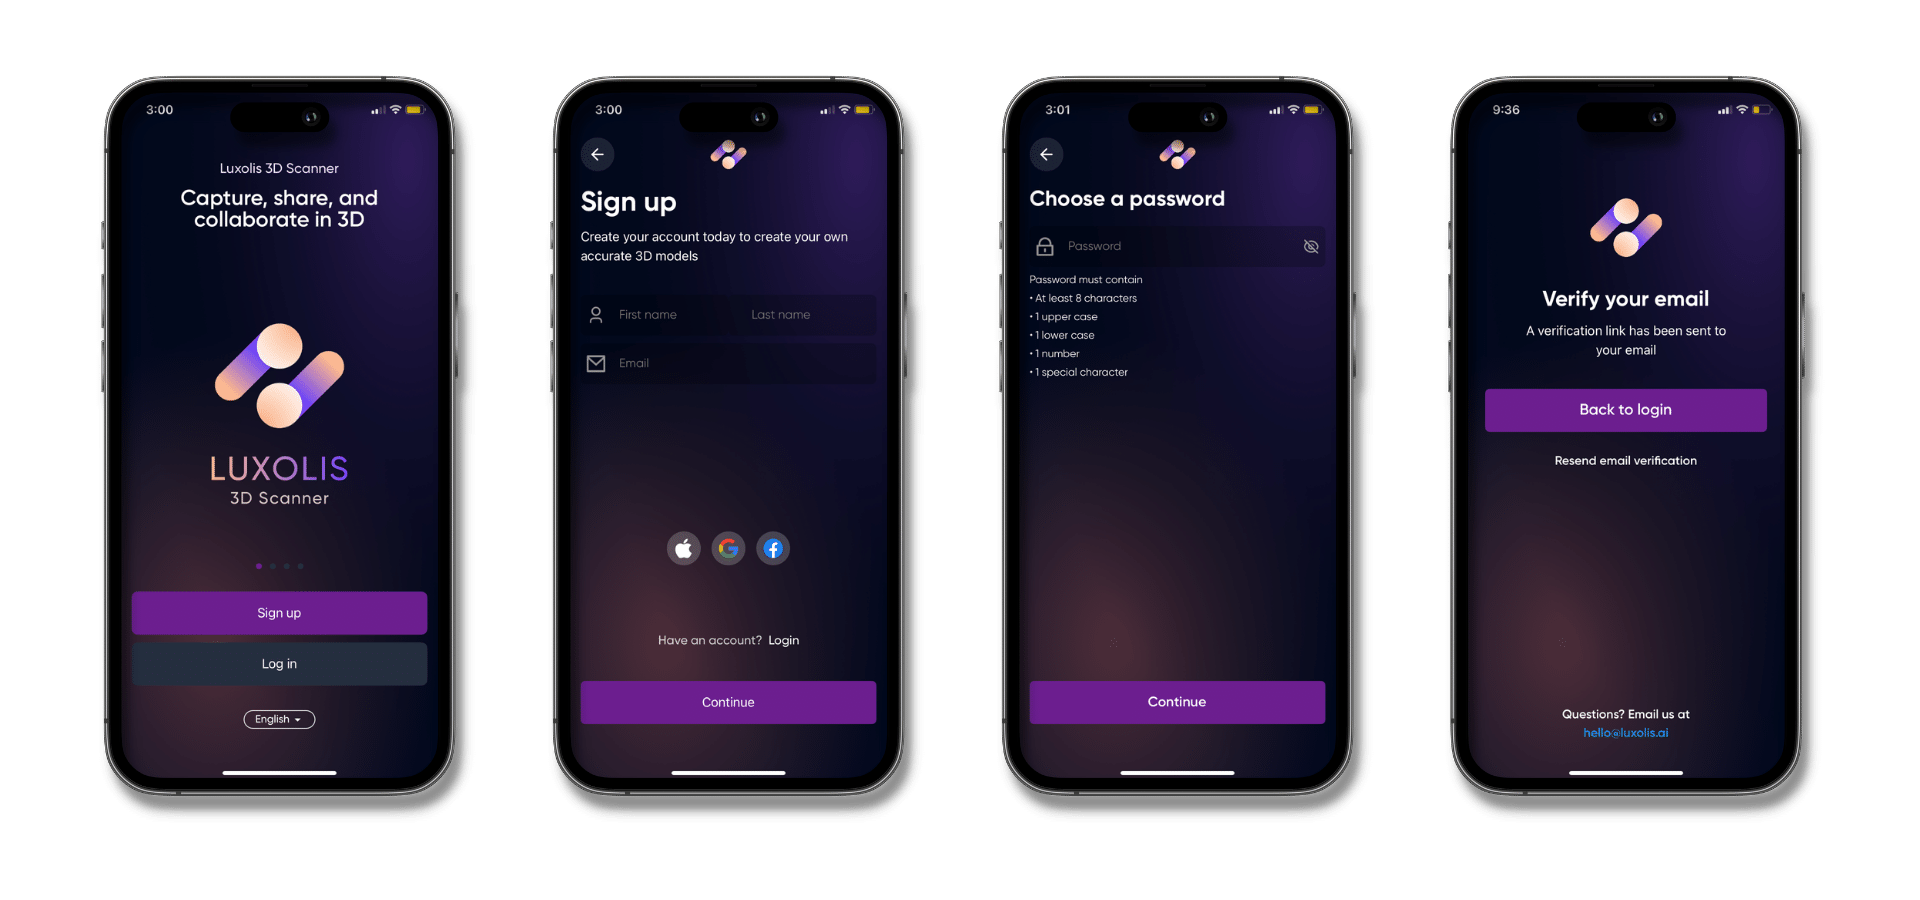
A: Open the Luxolis 3D Scanner app and click on the “Sign Up” button.
B: Input your name and email address, and create a secure password that you will easily remember.
C: Click on “Continue” and then head over to your email inbox to find the verification email from Luxolis.
D: Simply follow the link to verify your email address, and once you have completed this step, you are ready to return to the app and dive into the world of 3D scanning!
Step 3a: Login as an individual
Step 1: To login, simply click on the “Back to login” button in the app and Login using the same credentials you provided during registration.
Step 2: You will then be asked to select an account type.
Step 3: If you wish to choose an individual account for your personal use that does not require team collaboration tools, click on “Continue” in the Individual Account section.
Once you have done so, you will be promptly logged in and ready to unleash your creativity with the app’s incredible features!
Step 3b: Add an organization
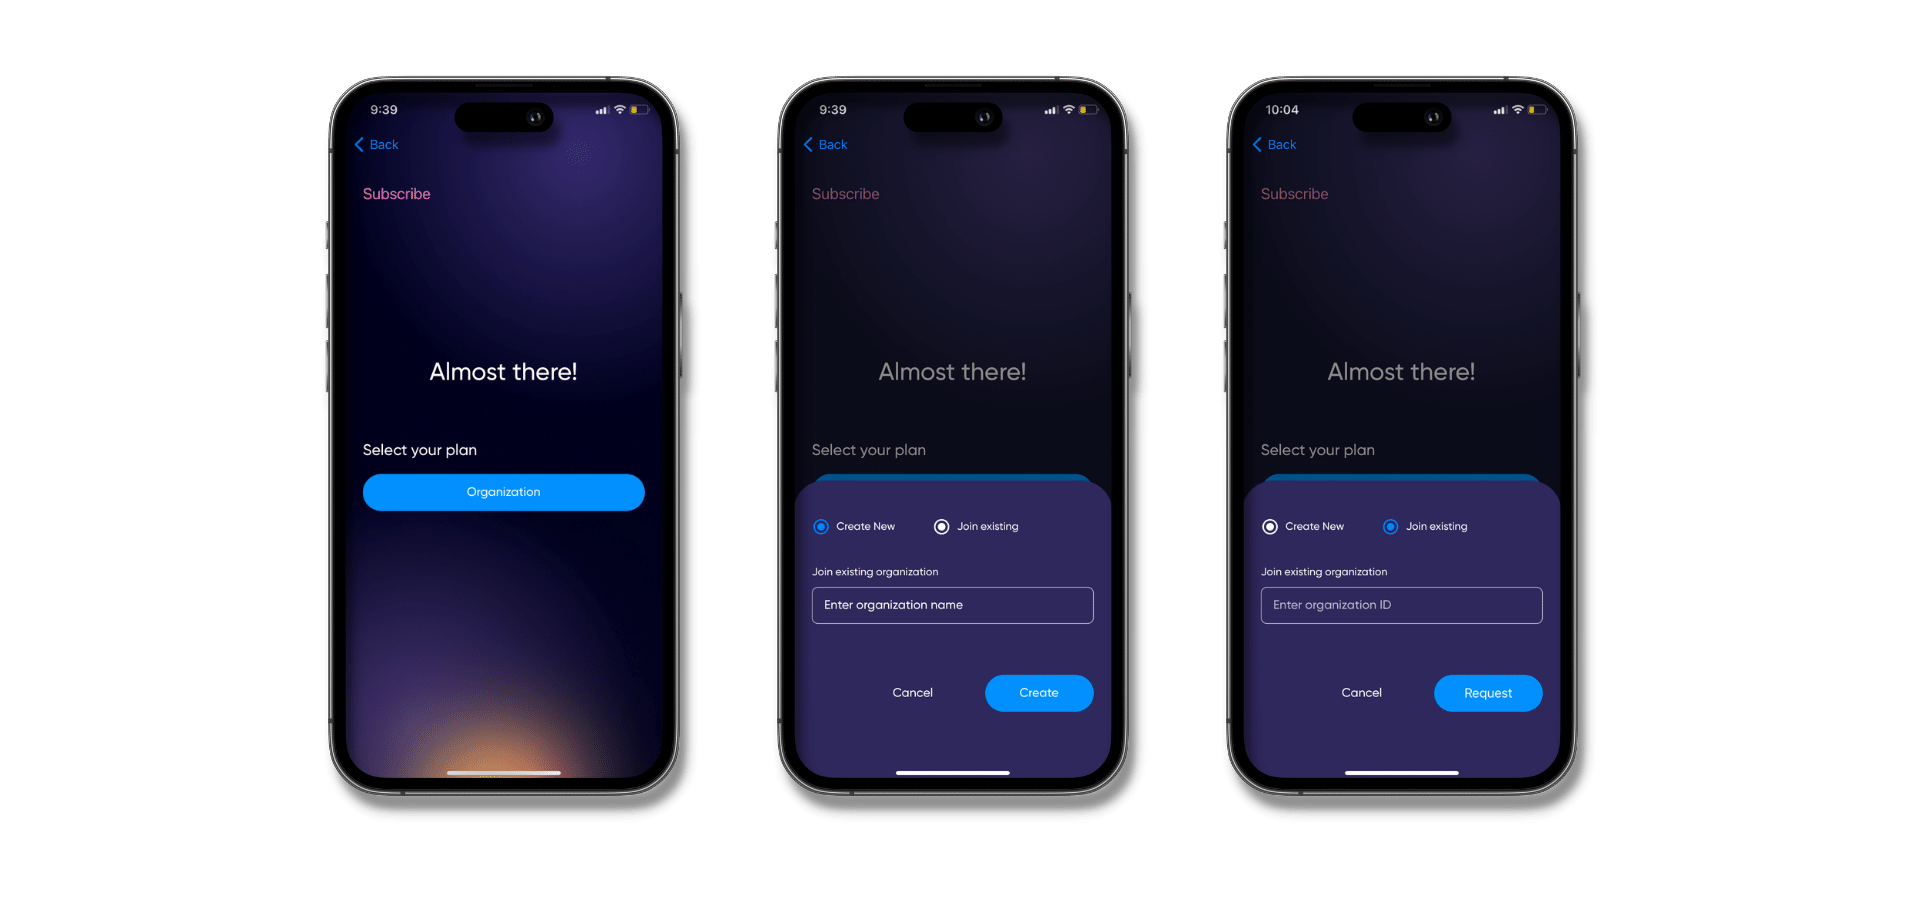
A: If you wish to login using a business account for team projects with collaboration tools, click on the “Add an Organization” button if your company does not have an existing account on the Luxolis 3D Scan App.
B: Add your organization’s name and upload your organization’s logo.
C: Click on “Continue”.
Now, get ready to elevate your business to the next level with Luxolis 3D Scan App’s incredible collaborative features!
Step 3c: Login as an organization
A: To join an already added organization, click on the “Join an Organization” button.
B: Enter or paste your Organization ID provided by your organization. You can also add a message while sending this request.
C: Select your role as a User or Admin.
D: Click on the “Continue” button.
E: Your request to join will be sent to your organization’s administrator. You will receive an email when the admin responds.
F: Once your organization admin lets you in, simply login using your credentials.
Congratulations, and welcome to the amazing world of Luxolis 3D Scan App! You have successfully completed the streamlined sign-up flow, and are now ready to unleash your creativity and explore the app’s exciting features.
Step 4: Ensure your account settings are correct
Update Display Picture
Step 1: To add or change your Display Picture, Click on the Edit icon.
Step 2: You can either Take a Photo or select a picture from your Photo Library.
Step 3: Move and Scale your picture for the desired outcome and click on “Use”.
Your display picture will be updated.
Update Display Name
Step 1: To update your display name, click on the “Edit” button beside current the Display Name.
Step 2: Enter your desired Display Name and click on “Done”.
Your display name will be updated.
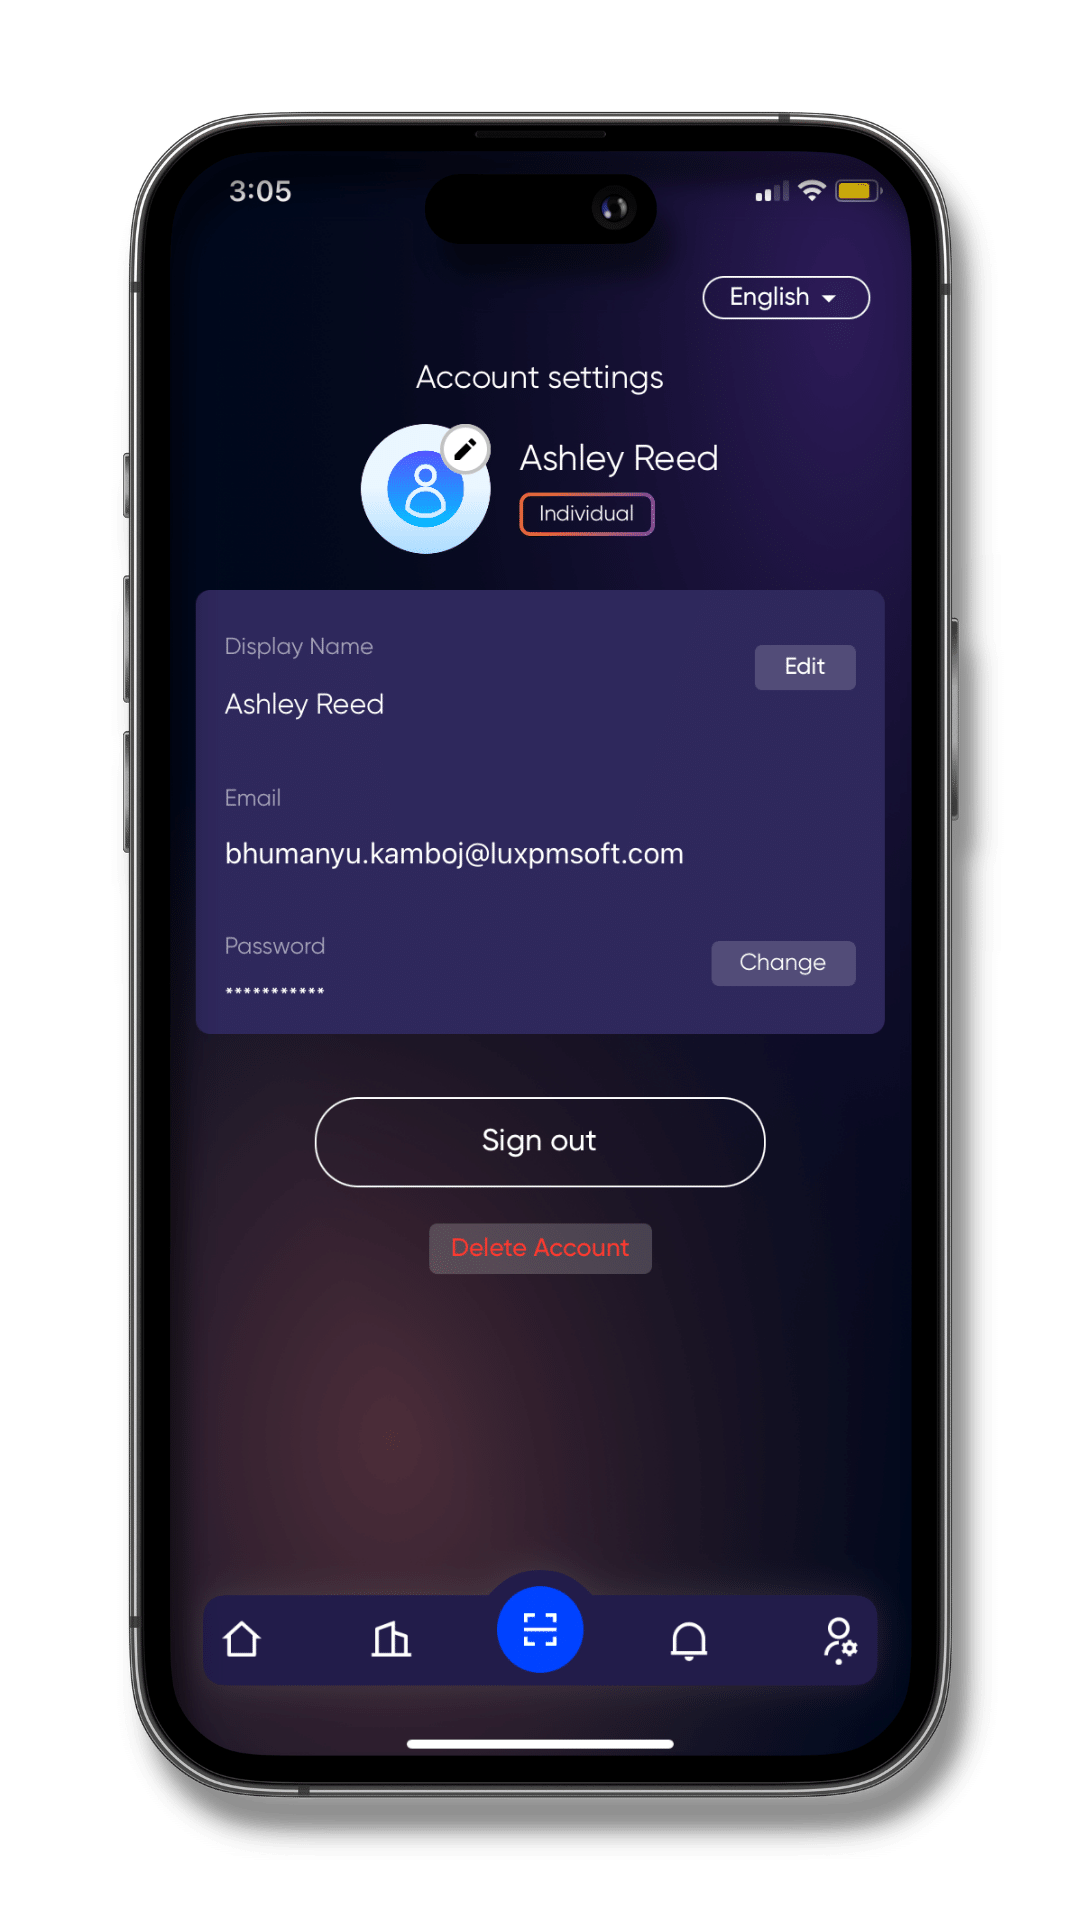
Change Password
Step 1: To change your password, click on the “Change” button.
Step 2: Enter your old password.
Step 3: Enter your new password and then confirm your new password.
Step 4: Click on “Done”.
Your password will be changed.
Step 5 : Capture stunning 3D Scans with Luxolis 3D Scan App
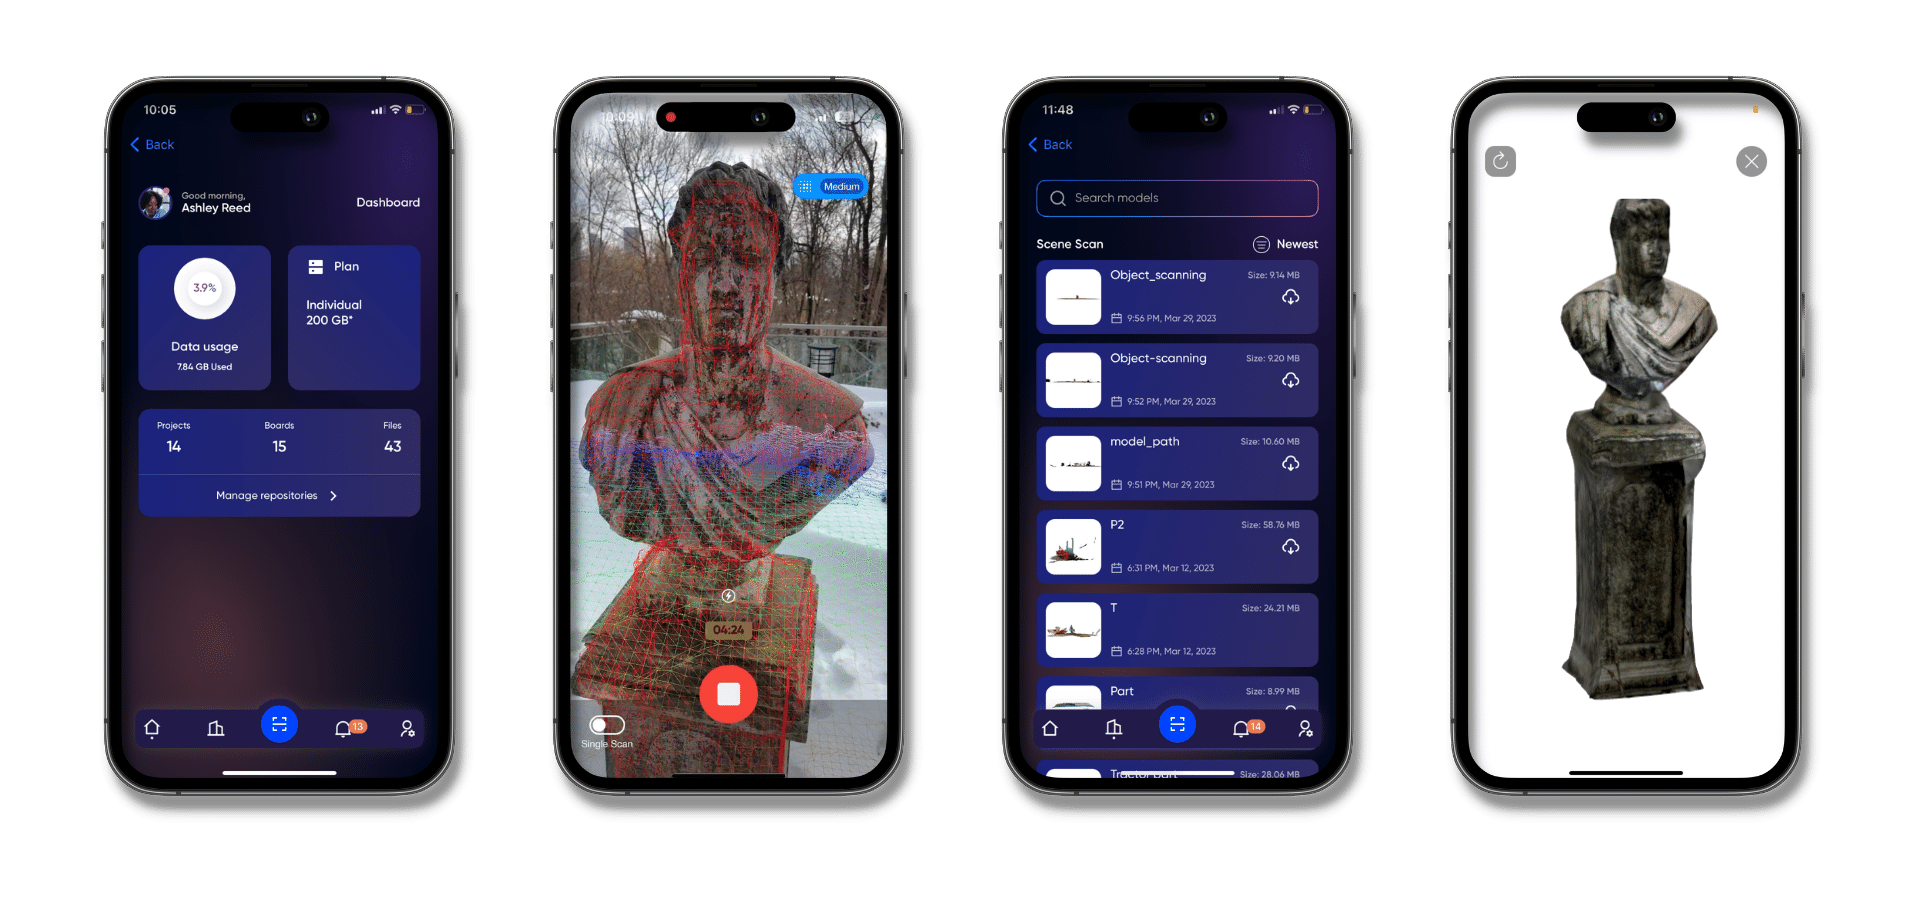
The Luxolis 3D Scan App’s lightning-fast scanning technology, lets you generate near real-time 3D models instantly! Ready to take your first scan? Simply follow these quick and easy steps to start exploring the world of 3D scanning.
Step 1: To start your 3D scan, click on the Scan button.
Step 2: Point your iPhone or iPad towards the direction of the scene that you want to capture and hit the Record button.
*To achieve the best results possible, it is essential to follow these simple guidelines while scanning your desired scene with the Luxolis 3D Scan App. Be sure to cover the entire area slowly and thoroughly, taking extra care to capture any twisted or complex areas that may be below eye level by bending down so that the sensor can detect all the hollow spaces. It is also recommended to avoid windows and mirrors during the scanning process, as these can often interfere with the quality of your scan. With these simple tips in mind, you can be sure to capture the most accurate and stunning 3D models with Luxolis 3D Scan App!*
Step 3: Once you have covered the entire area, end the scan by clicking on the record button again.
Step 4: Enter your Model Name and click on the “Done” button.
Step 5: Sit back and relax while your captured data is uploaded and the scene reconstruction is queued.
You will receive a notification once the reconstruction is complete.
Step 6: To view your 3D model, click on the “Scene Scan” button.
Step 7: You will find your latest 3D model at the top of the list. Click on your latest scan and wait while the app renders the file for display.
Step 8: Your 3D model will then be displayed on the screen once the file is ready.
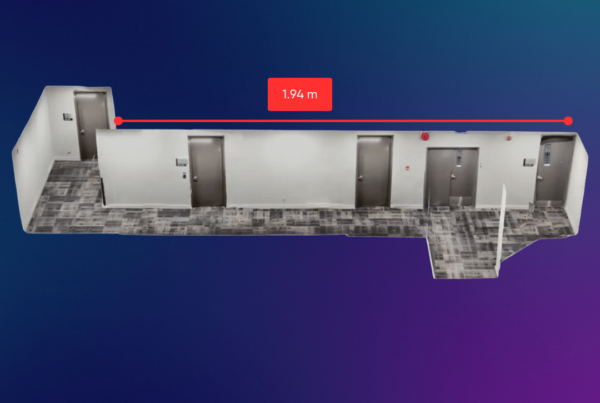
Step 9: To measure the length of any object in your 3D model, tap to begin measuring and tap again to end the measurement.
Step 10: You can rotate your 3D model or zoom in and out in any desired direction.
Welcome to the exciting world of 3D modeling with the Luxolis 3D Scan App! Your stunning 3D model is now ready, and the possibilities are endless. Want to share your creation with others, rename it for easy identification, or delete it to make room for your next masterpiece? Simply follow these steps to unlock the full potential of your Luxolis 3D Scan App.
Step 11: To share your latest 3D creation, click on the Model Options icon.
Step 12: To share the link to your 3D model, click on “Share link”. You can copy the link or directly share it with your contacts.
Step 13: To share the gITF file of your 3D model, click on “Share gITF file”. You can copy, save or directly share the file with your contacts or collaborators.
Step 14: To rename the 3D model, click on “Rename model” under the Model Options and enter the new name. Once you have entered the new name, click on “Confirm”.
Step 15: To delete the 3D model, click on “Delete model” under Model Options. A pop-up will be displayed to confirm the deletion. Click on “Delete” if you wish to delete the 3D model permanently or click on “Cancel” if you do not want to delete the model.
Step 6: Discover Luxolis 3D Scan App's Amazing Features
In addition to its powerful 3D scanning capabilities, the Luxolis 3D Scan App also includes a range of advanced features that allow you to take your projects to the next level. With the app’s easy-to-use repository creation and management tools, you can organize and store your projects with ease, while collaborating with your team in real-time using advanced commenting features. Ready to explore these exciting features? Let’s dive in and see what Luxolis 3D Scan App can do for you and your team!

Create a new repository
Step 1: Go to the dashboard and click on “Manage repositories”.
Step 2: To add or create a new repository, click on the “Add” button on the top right corner of the screen.
Step 3: Enter the name you want for the repository and choose if you want the repository to have “Public” or “Private” access.
Step 4: Click on the “Create” button.
You can add and manage users if you choose your repository to be private.
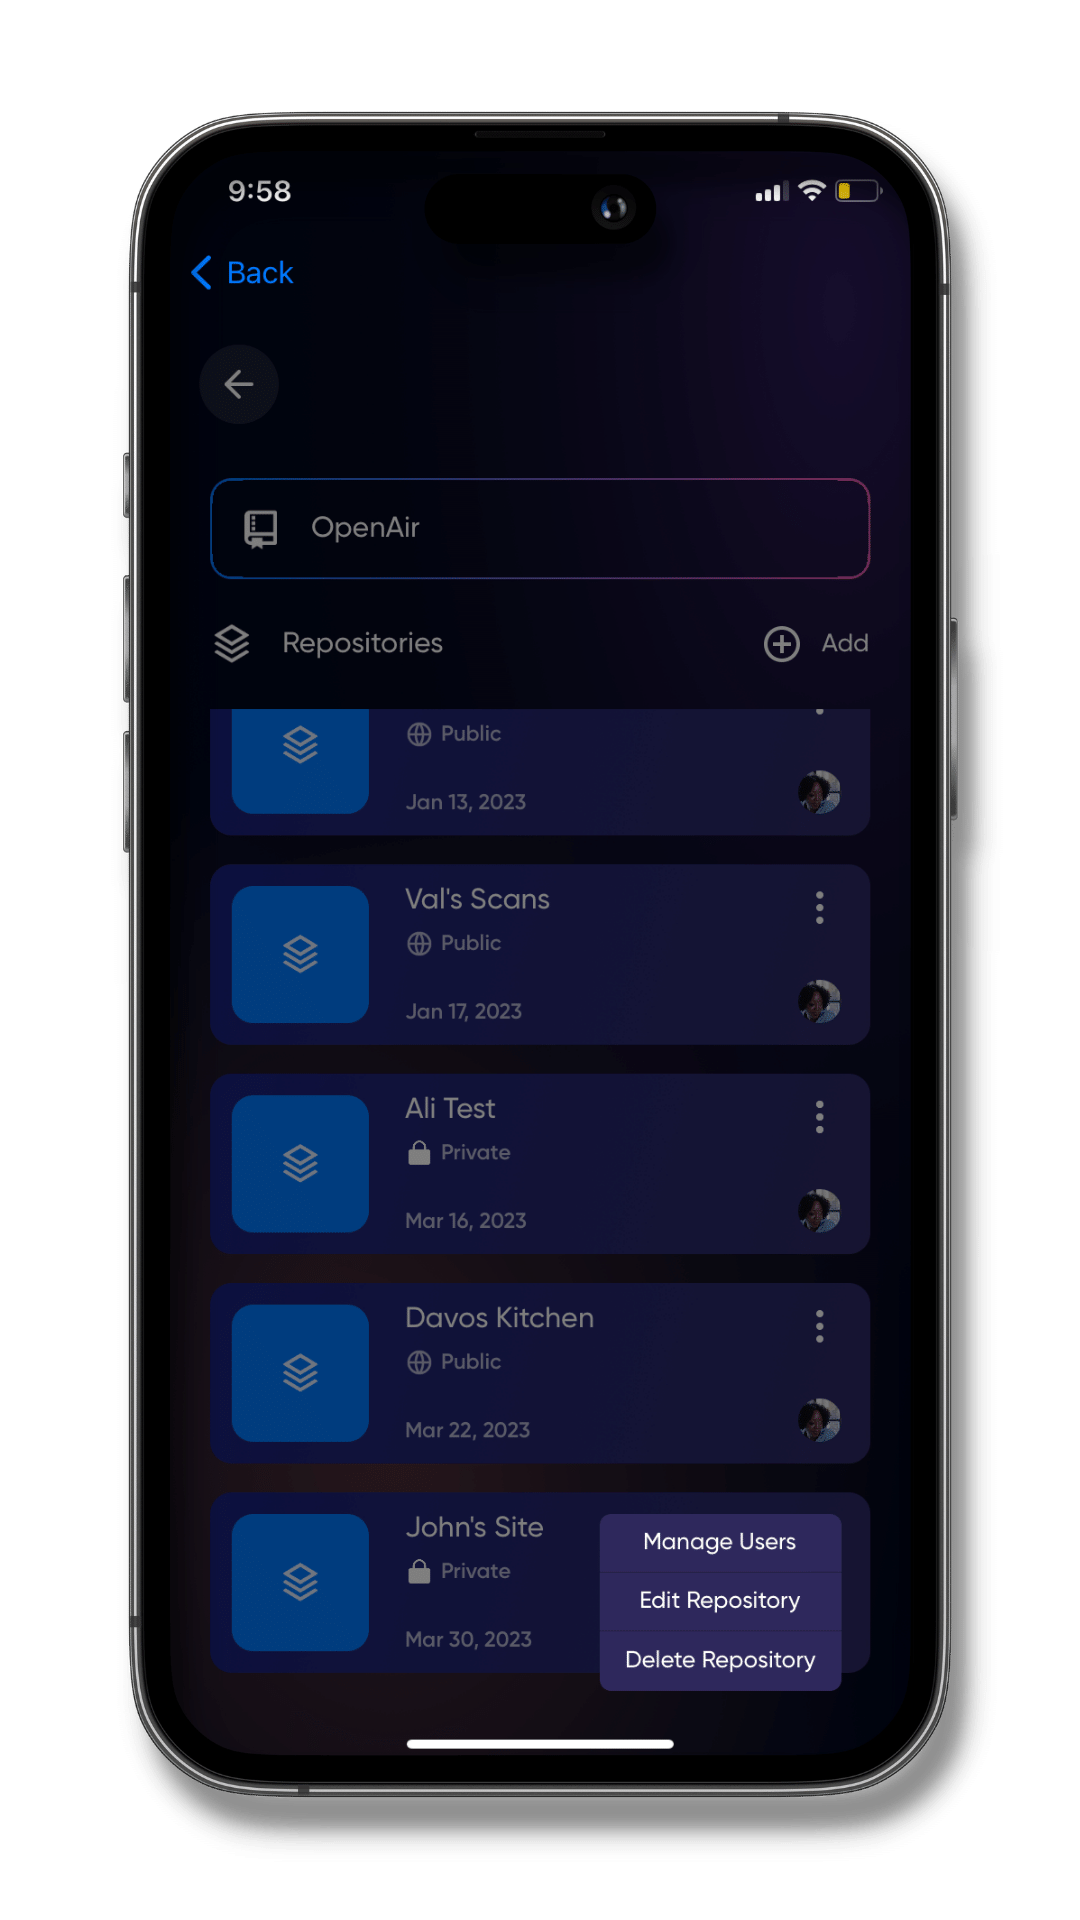
Manage users
Step 1: To add or manage users for your private repository, click on the “Options” button and click on “Manage Users”.
Step 2: Click on the “Add User” button.
Step 3: A list of users and admins will be displayed that are connected to your account. Select the users you want to add to your repository.
Step 4: Click on the “Save” button in the top right corner once you have selected the users that you want to add to your repository.
The selected members will be added to your repository.
Create a new workspace
Step 1: After adding users to your repository, open the repository by clicking on it.
Step 2: A “Main workplace” is added to your repository by default. If you wish to add another workspace, click on the “Add” button.
Step 3: Enter the name of your new workspace and add a description if you wish.
Step 4: Click on the “Create” button and the new workspace will be created.
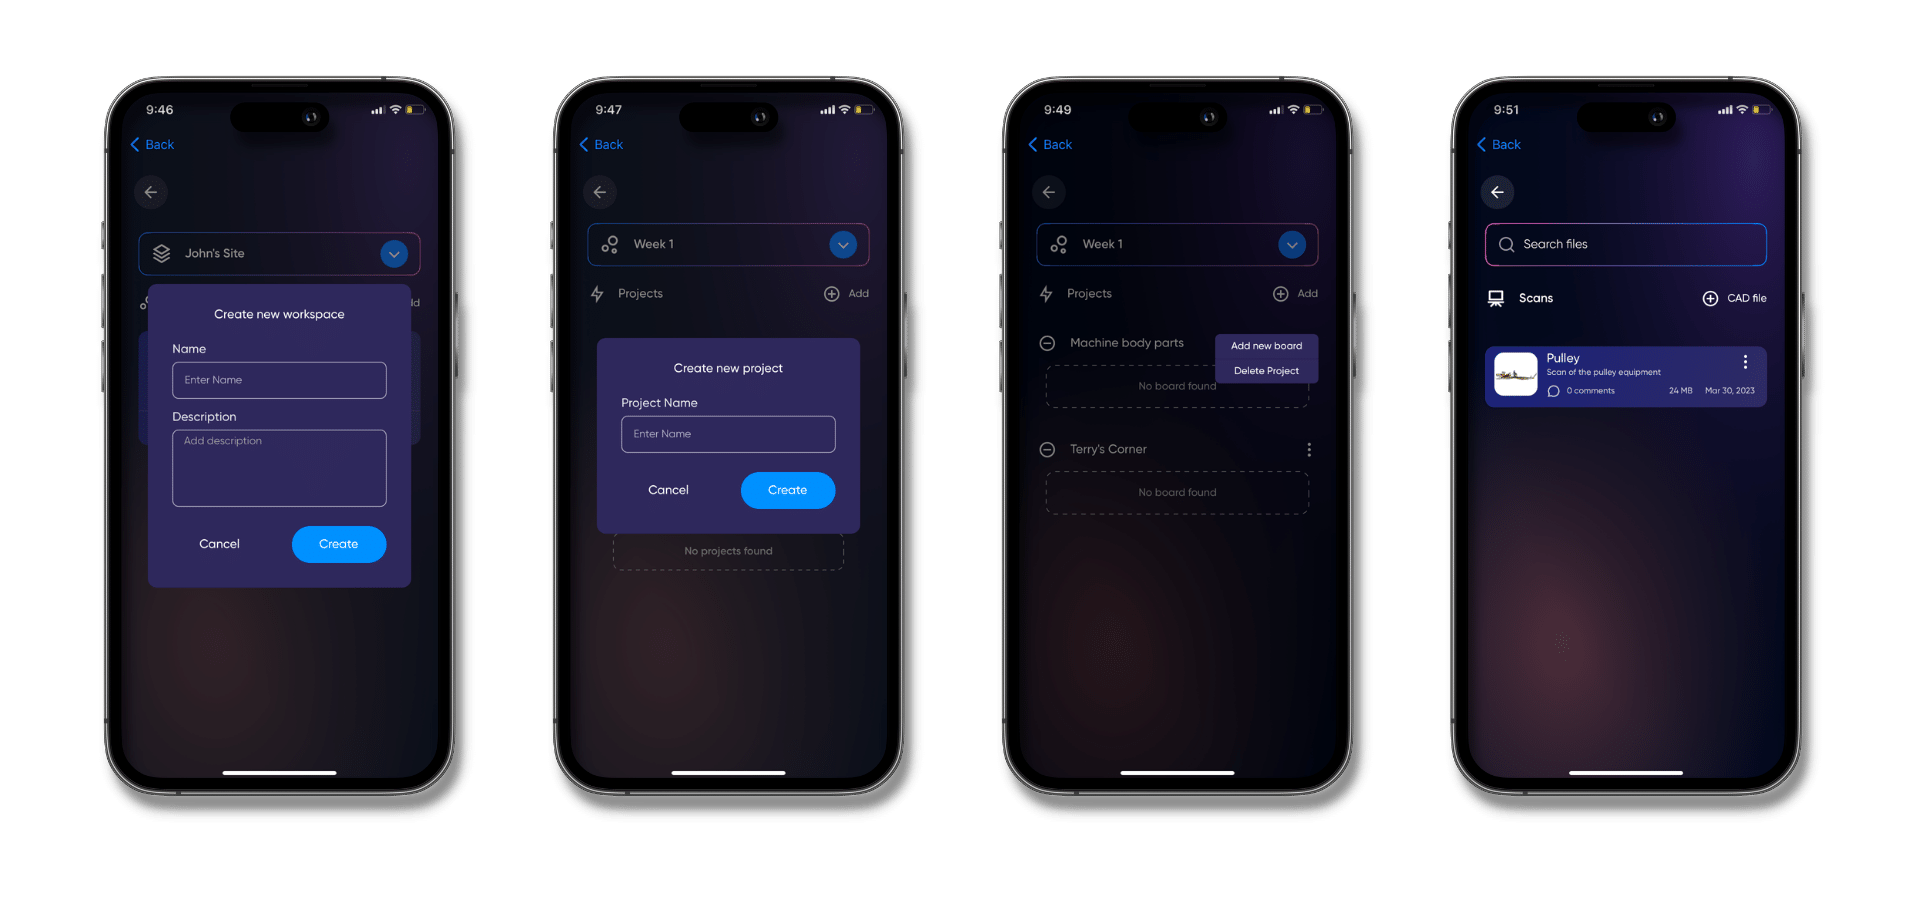
Create a new project
Step 1: To add a new project to your workspace, open the workspace where you wish to add a new project.
Step 2: Click on the “Add” button and enter the name of your project.
Step 3: Click on the “Create” button and your project will be created.
Add a new board
Step 1: To add a new board to your latest project, you can either click on the “No board found” button displayed in the middle of the screen or you can click on the “Options” icon and click “Add new board”.
Step 2: Enter the name that you want for your board.
Step 3: Click on “Confirm” and the new board will be added to your latest project.
You can now add your 3D models to the board and start collaborating with your team.
Step 4: To associate a 3D model to your project board, click on the “Add CAD file” button in the top right corner.
Step 5: Select a 3D model from your Scene Scan library.
Step 6: Enter a file name and add a description of your 3D model if you wish to.
Step 7: Click on the “Create” button.
Your 3D model has been successfully added to your board. Now it’s time to dive in and start exploring all the amazing features that the Luxolis 3D Scan App has to offer. Simply click on the 3D model to access a range of powerful tools, including the ability to measure and comment.
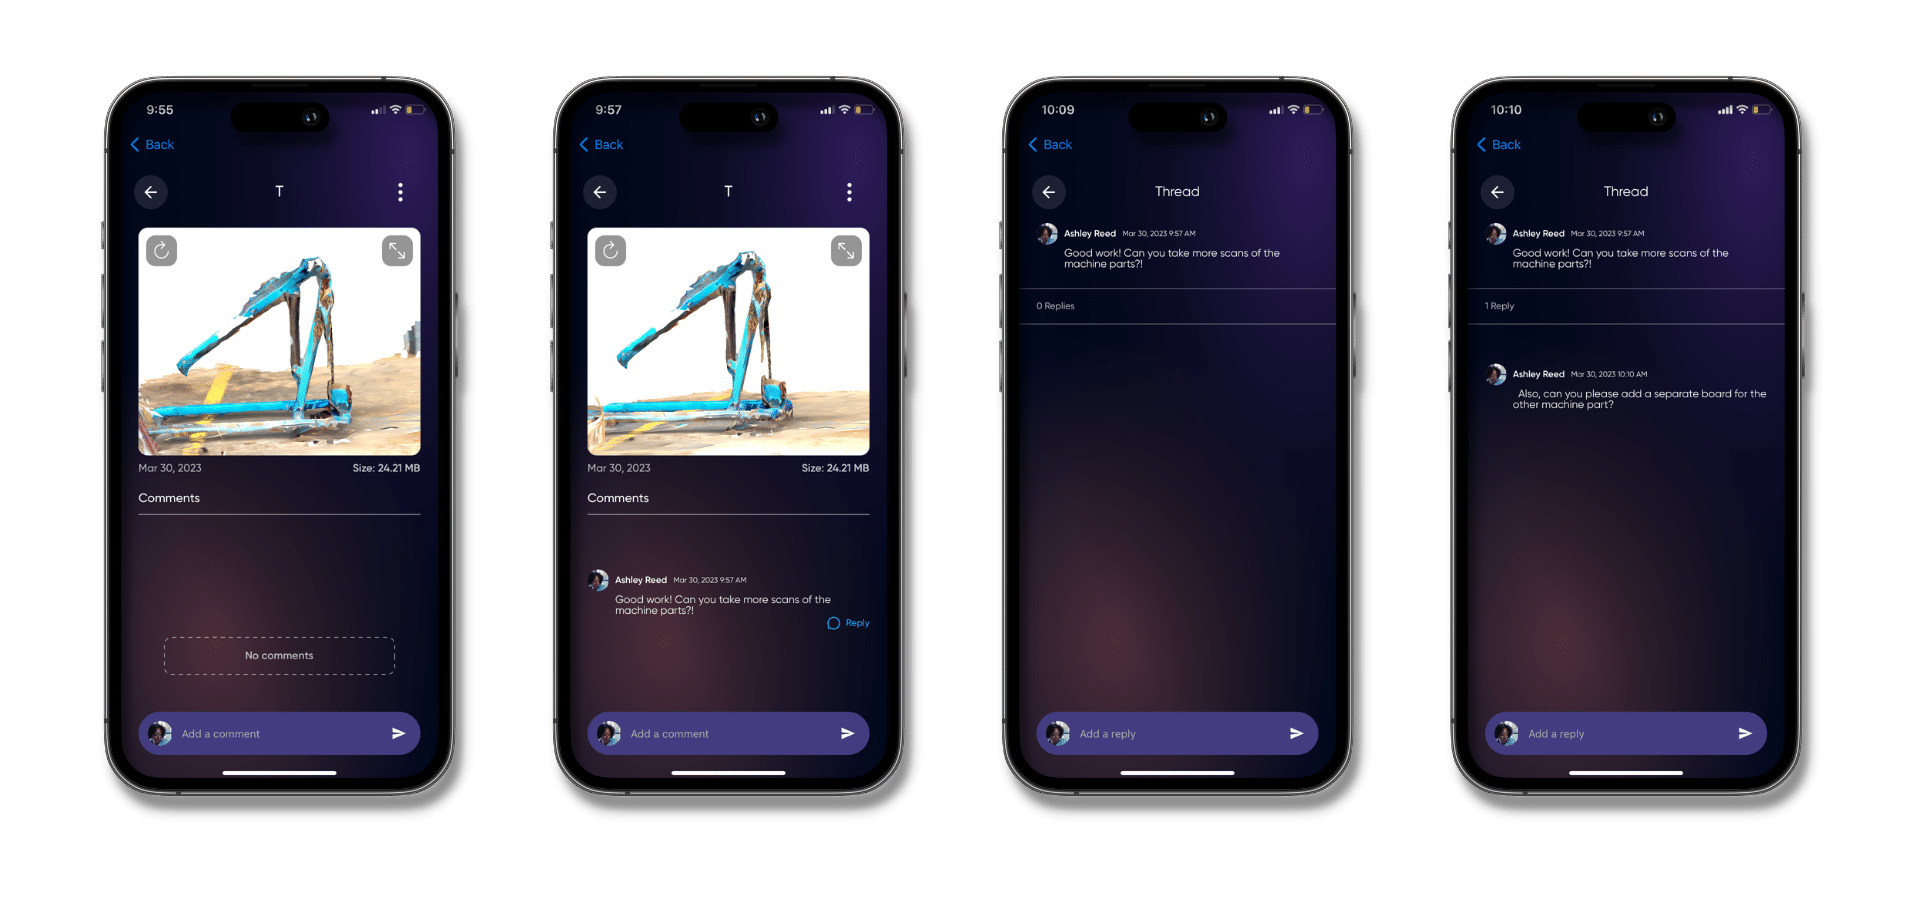
Add a comment
Once you open your 3D model, you will find the “Comments” section below the 3D model.
Step 1: To add a comment, go to the “Add a comment” section at the bottom and type in your comment.
Step 2: When you are done typing your comment, hit the “Send” button.
Fantastic! Your comment has been successfully added to the 3D model, and you can now leverage this powerful collaboration feature to share feedback and insights with your team members. With Luxolis 3D Scan App, you can add as many comments as you need to, allowing you to manage and collaborate on your projects with ease.
Reply to a comment
Step 1: If you wish to reply to any comment on your 3D model, click on the “Reply” button.
Step 2: Go to the “Add a reply” option at the bottom and type your reply.
Step 3: Click on the “Send” button.
Once you’ve added your reply, it will be seamlessly integrated into the comment thread, making team collaboration easier than ever before. With Luxolis 3D Scan App, you can work together with your colleagues to achieve amazing results, all while enjoying a streamlined and intuitive user experience.
With these step-by-step instructions, you are now fully equipped to create your very own 3D world using the Luxolis 3D Scan App. If you encounter any issues or have any questions about the app, you can reach out to our dedicated support team at hello@luxolis.ai. Now, it’s time to start exploring the amazing possibilities that this 3D world has to offer. Happy scanning!
Download the Luxolis 3D Scan App today to see how it can help with your next project – it’s free!